

I decided to participate in Craftaholics Anonymous Summer Handmade Gift Exchange. It was so fun and I'm excited for the next one in November.
It worked like most gift exchanges, there is a giftee and a gifter! The gifts had to be handmade, which was easy for me because I love being crafty. I often times do crafts in order to avoid scrapbooking. Not sure why, I think it is just a huge task I do not want to tackle since I'm years behind. I have often debated doing the scrapbooks you can design and order online. Has anyone made those? Any recommendations for me? Ok....I am WAY.OFF.TOPIC!
The most difficult part for me was deciding what to make for my person. I finally decided on a fun magnetic cookie sheet and magnets!


Want to know how I created the magnetic cookie sheet and marble magnets? I hope....because I'm going to let you know! It was super easy, once I got all the supplies collected.
Supplies Needed for Magnetic Cookie Sheet:
~Metal Cookie Sheet (used or new)
~Drill, nail, hammer, and round sander
~Craft Paint (or spray paint)
~Spray Adhesive
~Mod Podge, Matte Finish
~Scrapbook Paper
~Ribbon
~Sponge brushes for Mod Podge and paint (if using craft paint)
The first step is to drill the holes in the cookie sheet that you will use to hang it up with ribbon. I asked for B's assistance and he obliged very nicely. Everytime I have hubby help me with something tool related I have him teach me how to do it so I can do it myself next time. I'm just one of those girls that likes to be able to fend for herself if needed, so the more I know the better!
First, mark where you want the holes drilled on the cookie sheet. I measured mine a few inches in from the outside. Then take a nail (larger around the better) and hammer it a couple times where you want the hole drilled. Make sure not to hammer the nail clear through the cookie sheet, you only want to make an indention in the cookie sheet. This helps when you drill the hole. If you do not do this the drill will dance all over the cookie sheet and you probably wont get a hole drilled where you intended.

Next, you want to drill the holes using a drill bit the diameter of the size hole you want. You do not need that big of a hole since it just needs to be big enough for ribbon to slide through.
After the holes are drilled you want to take a round sander (can be found in the tool section of Lowes or Home Depot) and sand the inside of the holes. There will be sharp edges, so DO NOT skip this step.

After the holes are drilled you want to take a round sander (can be found in the tool section of Lowes or Home Depot) and sand the inside of the holes. There will be sharp edges, so DO NOT skip this step.

If you are using a new cookie sheet you might sand it a little to help the paint stick better. I found a used cookie sheet at the thrift store, so I did not do this step.
You are now ready to paint! I used craft paint, but if I do this project again I will just use spray paint. I only painted the back of the cookie sheet and the perimeter around the front. I did not paint the inside of the cookie sheet since that is where the paper will be placed. Let it dry and paint a second coat.


From this point forward I forgot to take pictures , but they are pretty self explanatory. Once the paint is dry pick out the scrapbook paper (s) (or you could use material) you want to use on the cookie sheet. Cut it down to fit the cookie sheet. I adhered the paper with spray adhesive instead of Mod Podge, although Mod Podge would work. I decided on spray adhesive because it would not be as thick as Mod Podge and would not interfere as much with the "magnetic" ability of the cookie sheet. Once you have the scrapbook paper(s) glued to the cookie sheet let it dry.
Next, Mod Podge over the ENTIRE cookie sheet, including the paint. You don't need a thick layer of Mod Podge, just enough to give it a protective coating.
Next, Mod Podge over the ENTIRE cookie sheet, including the paint. You don't need a thick layer of Mod Podge, just enough to give it a protective coating.
When the Mod Podge has dried it is time to add the ribbon. You can be creative and tie the ribbon how ever you like. Hint: You want the ribbon long enough so when you hang the cookie sheet it will hang flat and level against the wall.

You now have a magnetic cookie sheet! Wondering what you can use this for? Use it to hang notes on, kids art, recipes, or give it as a gift. I am actually going to make myself one to use in my bathroom. It will hold all my makeup. All I will do is add magnets to the back of my makeup containers ( I use BareMinerals so they are all little round containers) and put them on the magnetic cookie sheet! Saves space and is a fun looking addition to the bathroom!
If you are giving as a gift you can also make some fun marble magnets.


Supplies needed for Marble Magnets:
~Clear Marbes with flat bottoms (I found them in the floral section of Hobby Lobby)
~Round Magnets (make sure they are not bigger then the diameter of the marble)
~Hot Glue Gun & Glue Sticks
~Paper or Material
~Scissors
First, cut paper or material in squares. They just need to be big enough for the marble.


Next, hot glue the paper to the botton of the marbles.


Let them sit a few minutes to give the glue time to dry, then cut around the marble so there is no paper sticking out from behind the marble.


Once you have them all glued and cut down, glue the marbles onto the back of the marble & paper.

You have a magnet!
If you are giving them as a gift you want to put them in a pretty package.
Supplies needed for packaging marble magnets:
~Card-stock and Scrapbook Paper
~Canning lids (just the flat portion, you do not need the screw on lid part)
~Double Sided tape or scrapbeook adhesive
~Clear cellaphane bags
~Stapler
~Paper Cutter or Scissors
First, cut the cardstock to a size that covers the canning lid (forgot to write down my measurements, sorry!) You will want two peices of cardstock per canning lid.


Next, use double sided tape or scrapbook adhesive to tape the canning lid and scrapbook paper to either side of the canning lid.
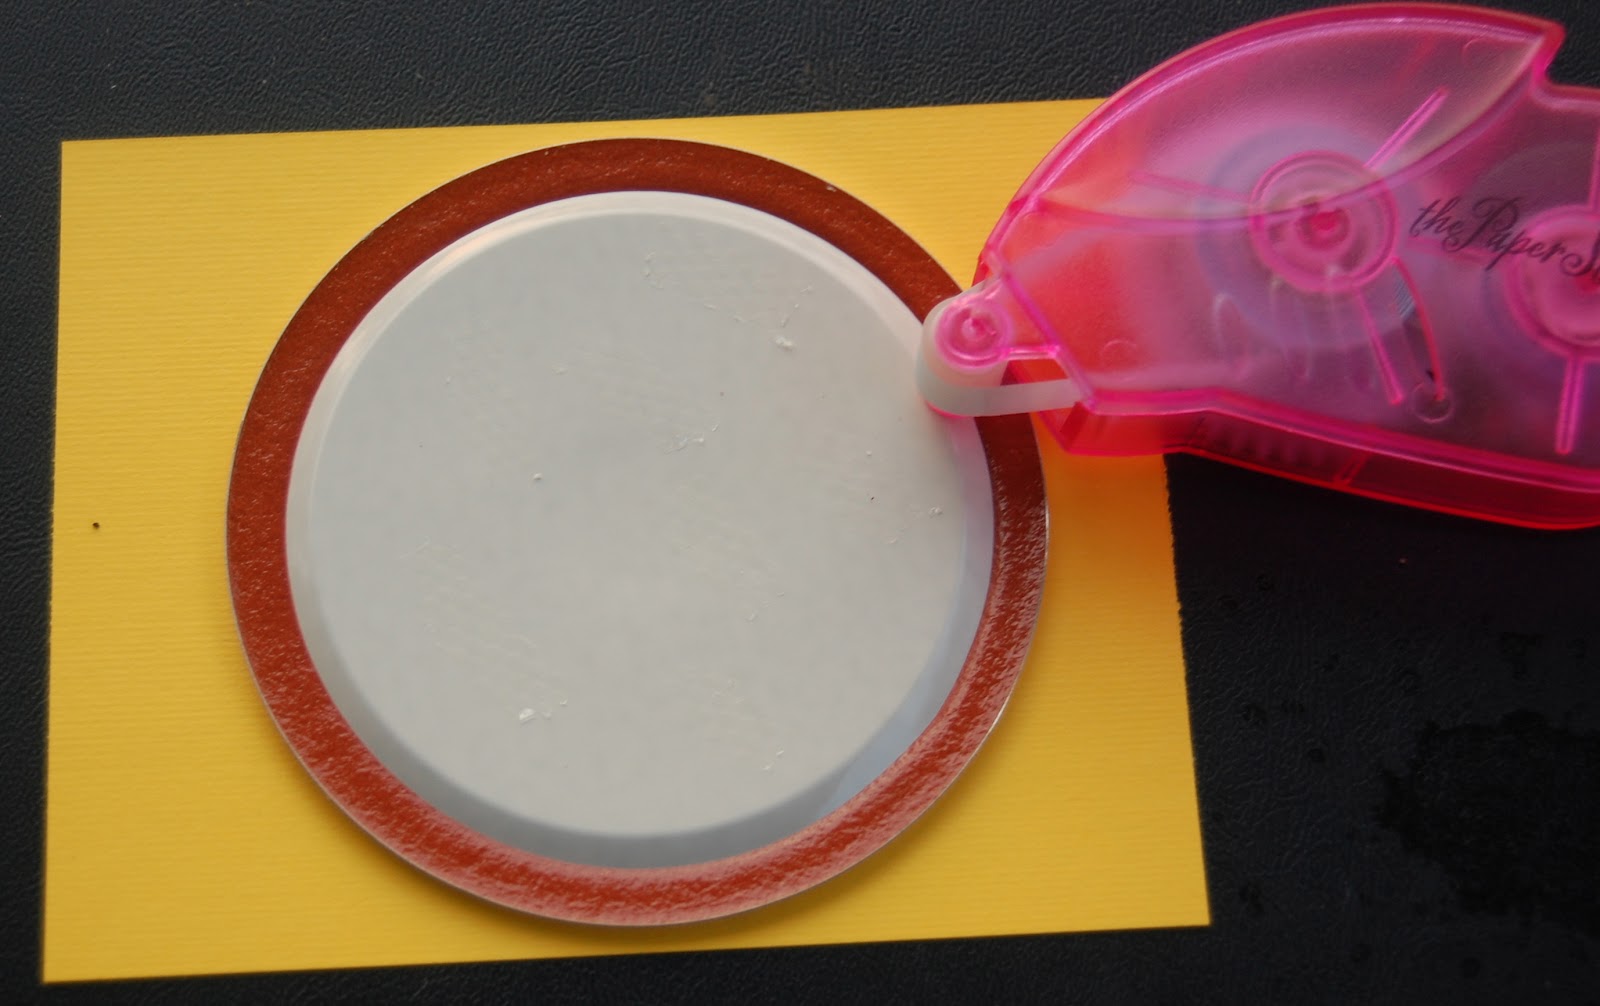
Now you can stick the magnets on the "magnetic" paper!


Slide the card with magents into the cellaphane bag. Fold down the bag and tape it down a little to help you not go crazy!
Take a piece of the scrapbook paper and cut it to fit the width of the cellaphane bag. Cut it large enough that you can fold it over the bag evenly. Once you have it folded and sitting over the bag, staple it at both sides of the bag. This is when adding a little tape to the cellophane bag in the prior step helps!

You now have a fun magnetic board and magnets to keep or give away as a gift to someone special!
The Quilted Fish
millionayres
Not Martha
Sabby in Suburbia
Tomorrow I will be showing you what I received in the gift exchange. I'm excited to show it all off! Hope you enjoyed this fun tutorial. What have crafts have you finished lately?
Til' next time,

Why the Mod Podge over everything at the end? I am a craft newbie. :)
ReplyDelete